Kubernetes Security Cheat Sheet
Overview
This cheat sheet provides a starting point for securing a Kubernetes cluster. It is divided into the following categories:
- Receive Alerts for Kubernetes Updates
- INTRODUCTION: What is Kubernetes?
- Securing Kubernetes hosts
- Securing Kubernetes components
- Using the Kubernetes dashboard
- Kubernetes Security Best Practices: Build Phase
- Kubernetes Security Best Practices: Deploy Phase
- Kubernetes Security Best Practices: Runtime Phase
For more information about Kubernetes, refer to the Appendix.
Receive Alerts for Security Updates and Reporting Vulnerabilities
Join the kubernetes-announce group (https://kubernetes.io/docs/reference/issues-security/security/) for emails about security announcements. See the security reporting page (https://kubernetes.io/docs/reference/issues-security/security) for more on how to report vulnerabilities.
INTRODUCTION: What Is Kubernetes?
Kubernetes is an open source container orchestration engine for automating deployment, scaling, and management of containerized applications. The open source project is hosted by the Cloud Native Computing Foundation (CNCF).
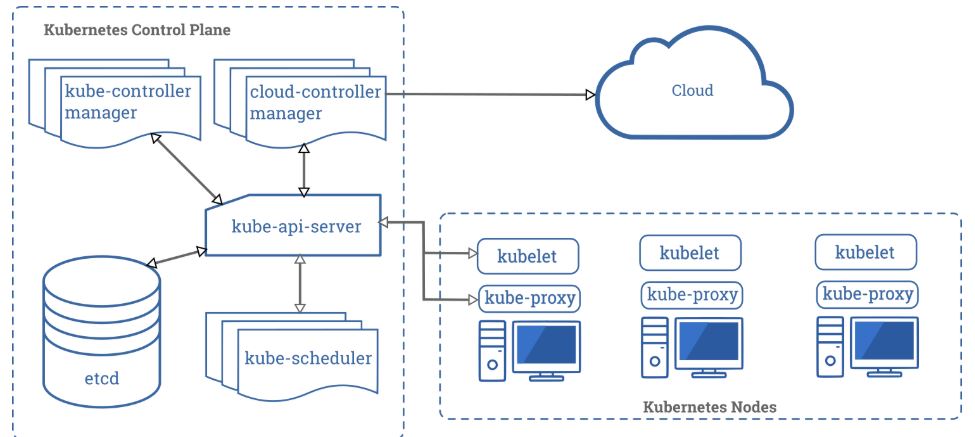
When you deploy Kubernetes, you get a cluster. A Kubernetes cluster consists of a set of worker machines, called nodes that run containerized applications. The control plane manages the worker nodes and the Pods in the cluster.
Control Plane Components
The control plane's components make global decisions about the cluster, as well as detecting and responding to cluster events. It consists of components such as kube-apiserver, etcd, kube-scheduler, kube-controller-manager and cloud-controller-manager.
Component: kube-apiserver
Description: Exposes the Kubernetes API. The API server is the front end for the Kubernetes control plane.
Component: etcd
Description: A consistent and highly-available key-value store used as Kubernetes' backing store for all cluster data.
Component: kube-scheduler
Description: Watches for newly created Pods with no assigned node, and selects a node for them to run on.
Component: kube-controller-manager
Description: Runs controller processes. Logically, each controller is a separate process, but to reduce complexity, they are all compiled into a single binary and run in a single process.
Component: cloud-controller-manager
Description: The cloud controller manager lets you link your cluster into your cloud provider's API, and separates out the components that interact with that cloud platform from components that just interact with your cluster.
Node Components
Node components run on every node, maintaining running pods and providing the Kubernetes runtime environment. It consists of components such as kubelet, kube-proxy and container runtime.
Component: kubelet
Description: An agent that runs on each node in the cluster. It makes sure that containers are running in a Pod.
Component: kube-proxy
Description: A network proxy that runs on each node in your cluster, implementing part of the Kubernetes Service concept.
Container: runtime
Description: The container runtime is the software that is responsible for running containers |
SECTION 1: Securing Kubernetes Hosts
Kubernetes can be deployed in different ways: on bare metal, on-premise, and in the public cloud (a custom Kubernetes build on virtual machines OR use a managed service). Since Kubernetes is designed to be highly portable, customers can easily and migrate their workloads and switch between multiple installations.
Because Kubernetes can be designed to fit a large variety of scenarios, this flexibility is a weakness when it comes to securing Kubernetes clusters. The engineers responsible for deploying the Kubernetes platform must know about all the potential attack vectors and vulnerabilities for their clusters.
To harden the underlying hosts for Kubernetes clusters, we recommend that you install the latest version of the operating systems, harden the operating systems, implement necessary patch management and configuration management systems, implement essential firewall rules and undertake specific datacenter-based security measures.
Updating Kubernetes
Since no one can track all potential attack vectors for your Kubernetes cluster, the first and best defense is to always run the latest stable version of Kubernetes.
In case vulnerabilities are found in running containers, it is recommended to always update the source image and redeploy the containers. Try to avoid direct updates to the running containers as this can break the image-container relationship.
Example: apt-update
Upgrading containers is extremely easy with the Kubernetes rolling updates feature - this allows gradually updating a running application by upgrading its images to the latest version.
Release schedule for Kubernetes
The Kubernetes project maintains release branches for the most recent three minor releases and it backports the applicable fixes, including security fixes, to those three release branches, depending on severity and feasibility. Patch releases are cut from those branches at a regular cadence, plus additional urgent releases, when required. Hence it is always recommended to upgrade the Kubernetes cluster to the latest available stable version. It is recommended to refer to the version skew policy for further details https://kubernetes.io/docs/setup/release/version-skew-policy/.
There are several techniques such as rolling updates, and node pool migrations that allow you to complete an update with minimal disruption and downtime.
--
SECTION 2: Securing Kubernetes Components
This section discusses how to secure Kubernetes components. It covers the following topics:
- Securing the Kubernetes Dashboard
- Restricting access to etcd (Important)
- Controlling network access to sensitive ports
- Controlling access to the Kubernetes API
- Implementing role-based access control in Kubernetes
- Limiting access to Kubelets
--
Securing the Kubernetes Dashboard
The Kubernetes dashboard is a webapp for managing your cluster. It is not a part of the Kubernetes cluster itself, it has to be installed by the owners of the cluster. Thus, there are a lot of tutorials on how to do this. Unfortunately, most of them create a service account with very high privileges. This caused Tesla and some others to be hacked via such a poorly configured K8s dashboard. (Reference: Tesla cloud resources are hacked to run cryptocurrency-mining malware - https://arstechnica.com/information-technology/2018/02/tesla-cloud-resources-are-hacked-to-run-cryptocurrency-mining-malware/)
To prevent attacks via the dashboard, you should follow some tips:
- Do not expose the dashboard without additional authentication to the public. There is no need to access such a powerful tool from outside your LAN
- Turn on Role-Based Access Control (see below), so you can limit the service account the dashboard uses
- Do not grant the service account of the dashboard high privileges
- Grant permissions per user, so each user only can see what they are supposed to see
- If you are using network policies, you can block requests to the dashboard even from internal pods (this will not affect the proxy tunnel via kubectl proxy)
- Before version 1.8, the dashboard had a service account with full privileges, so check that there is no role binding for cluster-admin left.
- Deploy the dashboard with an authenticating reverse proxy, with multi-factor authentication enabled. This can be done with either embedded OIDC
id_tokensor using Kubernetes Impersonation. This allows you to use the dashboard with the user's credentials instead of using a privilegedServiceAccount. This method can be used on both on-prem and managed cloud clusters.
--
Restricting Access To etcd (IMPORTANT)
etcd is a critical Kubernetes component which stores information on states and secrets, and it should be protected differently from the rest of your cluster. Write access to the API server's etcd is equivalent to gaining root on the entire cluster, and even read access can be used to escalate privileges fairly easily.
The Kubernetes scheduler will search etcd for pod definitions that do not have a node. It then sends the pods it finds to an available kubelet for scheduling. Validation for submitted pods is performed by the API server before it writes them to etcd, so malicious users writing directly to etcd can bypass many security mechanisms - e.g. PodSecurityPolicies.
Administrators should always use strong credentials from the API servers to their etcd server, such as mutual auth via TLS client certificates, and it is often recommended to isolate the etcd servers behind a firewall that only the API servers may access.
Limiting access to the primary etcd instance
Allowing other components within the cluster to access the primary etcd instance with read or write access to the full keyspace is equivalent to granting cluster-admin access. Using separate etcd instances for other components or using etcd ACLs to restrict read and write access to a subset of the keyspace is strongly recommended.
--
Controlling Network Access to Sensitive Ports
It is highly recommended to configure authentication and authorization on the cluster and cluster nodes. Since Kubernetes clusters usually listen on a range of well-defined and distinctive ports, it is easier for attackers to identify the clusters and attack them.
An overview of the default ports used in Kubernetes is provided below. Make sure that your network blocks access to ports, and you should seriously consider limiting access to the Kubernetes API server to trusted networks.
Control plane node(s):
| Protocol | Port Range | Purpose |
|---|---|---|
| TCP | 6443 | Kubernetes API Server |
| TCP | 2379-2380 | etcd server client API |
| TCP | 10250 | Kubelet API |
| TCP | 10259 | kube-scheduler |
| TCP | 10257 | kube-controller-manager |
| TCP | 10255 | Read-Only Kubelet API |
Worker nodes:
| Protocol | Port Range | Purpose |
|---|---|---|
| TCP | 10248 | Kubelet Healthz API |
| TCP | 10249 | Kube-proxy Metrics API |
| TCP | 10250 | Kubelet API |
| TCP | 10255 | Read-Only Kubelet API |
| TCP | 10256 | Kube-proxy Healthz API |
| TCP | 30000-32767 | NodePort Services |
--
Controlling Access To The Kubernetes API
The first line of defense of Kubernetes against attackers is limiting and securing access to API requests, because those requests are used to control the Kubernetes platform. For more information, refer to the documentation at https://kubernetes.io/docs/reference/access-authn-authz/controlling-access/.
This part contains the following topics:
- How Kubernetes handles API authorization
- External API Authentication for Kubernetes (recommended)
- Kubernetes Built-In API Authentication (not recommended)
- Implementing role-based access in Kubernetes
- Limiting access to Kubelets
--
How Kubernetes handles API authorization
In Kubernetes, you must be authenticated (logged in) before your request can be authorized (granted permission to access), and Kubernetes expects attributes that are common to REST API requests. This means that existing organization-wide or cloud-provider-wide access control systems which may handle other APIs work with Kubernetes authorization.
When Kubernetes authorizes API requests using the API server, permissions are denied by default. It evaluates all of the request attributes against all policies and allows or denies the request. All parts of an API request must be allowed by some policy in order to proceed.
--
External API Authentication for Kubernetes (RECOMMENDED)
Due to the weakness of Kubernetes' internal mechanisms for authenticating APIs, we strongly recommended that larger or production clusters use one of the external API authentication methods.
- OpenID Connect (OIDC) lets you externalize authentication, use short lived tokens, and leverage centralized groups for authorization.
- Managed Kubernetes distributions such as GKE, EKS and AKS support authentication using credentials from their respective IAM providers.
- Kubernetes Impersonation can be used with both managed cloud clusters and on-prem clusters to externalize authentication without having to have access to the API server configuration parameters.
In addition to choosing the appropriate authentication system, API access should be considered privileged and use Multi-Factor Authentication (MFA) for all user access.
For more information, consult Kubernetes authentication reference documentation at https://kubernetes.io/docs/reference/access-authn-authz/authentication.
--
Options for Kubernetes Built-In API Authentication (NOT RECOMMENDED)
Kubernetes provides a number of internal mechanisms for API server authentication but these are usually only suitable for non-production or small clusters. We will briefly discuss each internal mechanism and explain why you should not use them.
-
Static Token File: Authentication makes use of clear text tokens stored in a CSV file on API server node(s). WARNING: You cannot modify credentials in this file until the API server is restarted.
-
X509 Client Certs are available but are unsuitable for production use, since Kubernetes does not support certificate revocation. As a result, these user credentials cannot be modified or revoked without rotating the root certificate authority key and re-issuing all cluster certificates.
-
Service Accounts Tokens are also available for authentication. Their primary intended use is to allow workloads running in the cluster to authenticate to the API server, however they can also be used for user authentication.
--
Implementing Role-Based Access Control in Kubernetes
Role-based access control (RBAC) is a method for regulating access to computer or network resources based on the roles of individual users within your organization. Fortunately, Kubernetes comes with an integrated Role-Based Access Control (RBAC) component with default roles that allow you to define user responsibilities depending on what actions a client might want to perform. You should use the Node and RBAC authorizers together in combination with the NodeRestriction admission plugin.
The RBAC component matches an incoming user or group to a set of permissions linked to roles. These permissions combine verbs (get, create, delete) with resources (pods, services, nodes) and can be namespace or cluster scoped. RBAC authorization uses the rbac.authorization.k8s.io API group to drive authorization decisions, allowing you to dynamically configure policies through the Kubernetes API.
To enable RBAC, start the API server with the --authorization-mode flag set to a comma-separated list that includes RBAC; for example:
kube-apiserver --authorization-mode=Example,RBAC --other-options --more-options
For detailed examples of utilizing RBAC, refer to Kubernetes documentation at https://kubernetes.io/docs/reference/access-authn-authz/rbac
--
Limiting access to the Kubelets
Kubelets expose HTTPS endpoints which grant powerful control over the node and containers. By default Kubelets allow unauthenticated access to this API. Production clusters should enable Kubelet authentication and authorization.
For more information, refer to Kubelet authentication/authorization documentation at https://kubernetes.io/docs/reference/access-authn-authz/kubelet-authn-authz/
--
SECTION 3: Kubernetes Security Best Practices: Build Phase
During the build phase, you should secure your Kubernetes container images by building secure images and scanning those images for any known vulnerabilities.
--
What is a container image?
A container image (CI) is an immutable, lightweight, standalone package that contains everything required to run an application — the application code, runtime, system libraries, configuration and system tools. Images are built as layered, read-only artifacts that are portable between hosts but share the host machine’s operating system kernel. See Docker: What is a container? (https://www.docker.com/resources/what-container).
Your CIs must be built on a approved and secure base image. This base image must be scanned and monitored at regular intervals to ensure that all CIs are based on a secure and authentic image. Implement strong governance policies that determine how images are built and stored in trusted image registries.
--
Ensure that CIs are up to date
Ensure your images (and any third-party tools you include) are up-to-date and use the latest versions of their components.
--
Only use authorized images in Your environment
Downloading and running CIs from unknown sources is very dangerous. Make sure that only images adhering to the organization’s policy are allowed to run, or else the organization is open to risk of running vulnerable or even malicious containers.
--
Use A CI Pipeline To Control and Identify Vulnerabilities
The Kubernetes container registry serves as a central repository of all container images in the system. Depending on your needs, you can utilize a public repository or have a private repository as the container registry. We recommend that you store your approved images in a private registry and only push approved images to these registries, which automatically reduces the number of potential images that enter your pipeline down to a fraction of the hundreds of thousands of publicly available images.
Also, we strongly recommend that you add a CI pipeline that integrates security assessment (like vulnerability scanning) into the build process. This pipeline should vet all code that is approved for production and is used to build the images. After an image is built, it should be scanned for security vulnerabilities. Only if no issues are found, then the image would be pushed to a private registry then deployed to production. If the security assessment mechanism fails any code, it should create a failure in the pipeline, which will help you find images with security problems and prevent them from entering the image registry.
Many source code repositories provide scanning capabilities (e.g. Github, GitLab), and many CI tools offer integration with open source vulnerability scanners such as Trivy or Grype.
Projects are developing image authorization plugins for Kubernetes that prevent unauthorized images from shipping. For more information, refer to the PR https://github.com/kubernetes/kubernetes/pull/27129.
--
Minimize Features in All CIs
As a best practice, Google and other tech giants have strictly limiting the code in their runtime container for years. This approach improves the signal-to-noise of scanners (e.g. CVE) and reduces the burden of establishing provenance to just what you need.
Consider using minimal CIs such as distroless images (see below). If this is not possible, do not include OS package managers or shells in CIs because they may have unknown vulnerabilities. If you absolutely must include any OS packages, remove the package manager at a later step in the generation process.
--
Use distroless or empty images when possible
Distroless images sharply reduce the attack surface because they do not include shells and contain fewer packages than other images. For more information on distroless images, refer to https://github.com/GoogleContainerTools/distroless.
An empty image, ideal for statically compiled languages like Go, because the image is empty - the attack surface it is truly minimal - only your code!
For more information, refer to https://hub.docker.com/_/scratch
SECTION 4: Kubernetes Security Best Practices: Deploy Phase
Once a Kubernetes infrastructure is in place, you must configure it securely before any workloads are deployed. And as you configure your infrastructure, ensure that you have visibility into what CIs are being deployed and how they are being deployed or else you will not be able to identify and respond to security policy violations. Before deployment, your system should know and be able to tell you:
- What is being deployed - including information about the image being used, such as components or vulnerabilities, and the pods that will be deployed.
- Where it is going to be deployed - which clusters, namespaces, and nodes.
- How it is deployed - whether it runs privileged, what other deployments it can communicate with, the pod security context that is applied, if any.
- What it can access - including secrets, volumes, and other infrastructure components such as the host or orchestrator API.
- Is it compliant? - whether it complies with your policies and security requirements.
--
Code that uses namespaces to isolate Kubernetes resources
Namespaces give you the ability to create logical partitions, enforce separation of your resources and limit the scope of user permissions.
--
Setting the namespace for a request
To set the namespace for a current request, use the --namespace flag. Refer to the following examples:
kubectl run nginx --image=nginx --namespace=<insert-namespace-name-here>
kubectl get pods --namespace=<insert-namespace-name-here>
--
Setting the namespace preference
You can permanently save the namespace for all subsequent kubectl commands in that context with:
kubectl config set-context --current --namespace=<insert-namespace-name-here>
Then validate it with the following command:
kubectl config view --minify | grep namespace:
Learn more about namespaces at https://kubernetes.io/docs/concepts/overview/working-with-objects/namespaces
--
Use the ImagePolicyWebhook to govern image provenance
We strongly recommend that you use the admission controller ImagePolicyWebhook to prevent unapproved images from being used, reject pods that use unapproved images, and refuse CIs that meet the following criteria:
- Images that haven’t been scanned recently
- Images that use a base image that’s not explicitly allowed
- Images from insecure registries
Learn more about webhook at https://kubernetes.io/docs/reference/access-authn-authz/admission-controllers/#imagepolicywebhook
--
Implement continuous security vulnerability scanning
Since new vulnerabilities are always being discovered, you may not always know if your containers may have recently-disclosed vulnerabilities (CVEs) or outdated packages. To maintain a strong security posture, do regular production scanning of first-party containers (applications you have built and previously scanned) as well as third-party containers (which are sourced from trusted repository and vendors).
Open Source projects such as Trivy, Grype, and Clair can assist in identifying and prioritizing vulnerabilities.
--
Apply security context to your pods and containers
The security context is a property that is defined in the deployment yaml and controls the security parameters for all pod/container/volumes, and it should be applied throughout your infrastructure. When the security context property is properly implemented everywhere, it can eliminate entire classes of attacks that rely on privileged access. For example, any attack that depends on installing software or writing to the file system will be stopped if you specify read-only root file systems in the security context.
When you are configuring the security context for your pods, only grant the privileges that are needed for the resources to function in your containers and volumes. Some of the important parameters in the security context property are:
Security Context Settings:
-
SecurityContext->runAsNonRoot
Description: Indicates that containers should run as non-root user. -
SecurityContext->Capabilities
Description: Controls the Linux capabilities assigned to the container. -
SecurityContext->readOnlyRootFilesystem
Description: Controls whether a container will be able to write into the root filesystem. -
PodSecurityContext->runAsNonRoot
Description: Prevents running a container with 'root' user as part of the pod |
Security context example: A pod definition that includes security context parameters
apiVersion: v1

kind: Pod
metadata:
  name: hello-world
spec:
  containers:
  # specification of the pod’s containers
  # ...
  # ...
  # Security Context
  securityContext:
    readOnlyRootFilesystem: true
    runAsNonRoot: true
For more information on security context for Pods, refer to the documentation at https://kubernetes.io/docs/tasks/configure-pod-container/security-context
--
Continuously assess the privileges used by containers
We strongly recommend that all your containers should adhere to the principle of least privilege, since your security risk is heavily influenced by the capabilities, role bindings, and privileges given to containers. Each container should only have the minimum privileges and capabilities that allows it to perform its intended function.
Utilize Pod Security Standards and the Built-in Pod Security Admission Controller to enforce container privilege levels
Pod Security Standards combined with the Pod Security Admission Controller allow cluster administrators to enforce requirements on a pods securityContext fields. Three Pod Security Standard profiles exist:
- Privileged: Unrestricted, allows for known privilege escalations. Intended for use with system and infrastructure level workloads that require privilege to operate properly. All securityContext settings are permitted
- Baseline: Minimally restrictive policy designed for common containerized workloads while preventing known privilege escalations. Targeted at developers and operators of non-critical applications. The most dangerous securityContext settings, such as securityContext.privileged, hostPID, hostPath, hostIPC, are not permitted.
- Restricted: The most restrictive policy, designed to enforce current Pod hardening practices at the expense of some compatibility. Intended for security critical workloads or untrusted users. Restricted includes all of the enforcements from the baseline policy, in addition to much more restrictive requirements, such as requiring the dropping of all capabilities, enforcing runAsNotRoot, and more.
Each of the profiles have defined settings baselines that can be found in more detail here.
The Pod Security Admission Controller allows you to enforce, audit, or warn upon the violation of a defined policy. audit and warn modes can be utilized to determine if a particular Pod Security Standard would normally prevent the deployment of a pod when set to enforce mode.
Below is an example of a namespace that would only allow Pods to be deployed that conform to the restricted Pod Security Standard:
apiVersion: v1
kind: Namespace
metadata:
  name: policy-test
  labels:
    pod-security.kubernetes.io/enforce: restricted
    pod-security.kubernetes.io/audit: restricted
    pod-security.kubernetes.io/warn: restricted
Cluster administrators should properly organize and and enforce policy on cluster namespaces, only permitting the privileged policy on namespaces where it is absolutely required, such as for critical cluster services that require access to the underlying host. Namespaces should be set to the lowest Pod Security Policy that can be enforced and supports their risk level.
If more granular policy enforcement is required beyond the three profiles (Privileged, Baseline, Restricted), Third party admission controllers like OPA Gatekeeper or Kyverno, or built-in Validating Admission Policy can be utilized.
Use Pod security policies to control the security-related attributes of pods, which includes container privilege levels
Warning
Kubernetes deprecated Pod Security Policies in favor of Pod Security Standards and the Pod Security Admission Controller, and was removed from Kubernetes in v1.25. Consider using Pod Security Standards and the Pod Security Admission Controller instead.
All security policies should include the following conditions:
- Application processes do not run as root.
- Privilege escalation is not allowed.
- The root filesystem is read-only.
- The default (masked) /proc filesystem mount is used.
- The host network or process space should NOT be used - using
hostNetwork: truewill cause NetworkPolicies to be ignored since the Pod will use its host network. - Unused and unnecessary Linux capabilities are eliminated.
- Use SELinux options for more fine-grained process controls.
- Give each application its own Kubernetes Service Account.
- If a container does not need to access the Kubernetes API, do not let it mount the service account credentials.
For more information on Pod security policies, refer to the documentation at https://kubernetes.io/docs/concepts/policy/pod-security-policy/.
--
Providing extra security with a service mesh
A service mesh is an infrastructure layer that can handle communications between services in applications quickly, securely and reliably, which can help reduce the complexity of managing microservices and deployments. They provide a uniform way to secure, connect and monitor microservices. and a service mesh is great at resolving operational challenges and issues when running those containers and microservices.
Advantages of a service mesh
A service mesh provides the following advantages:
- Observability
It generates tracing and telemetry metrics, which make it easy to understand your system and quickly root cause any problems.
- Specialized security features
It provides security features which quickly identify any compromising traffic that enters your cluster and can secure the services inside your network if they are properly implemented. It can also help you manage security through mTLS, ingress and egress control, and more.
- Ability to secure microservices with mTLS
Since securing microservices is hard, there are many tools that address microservices security. However, the service mesh is the most elegant solution for addressing encryption of on-the-wire traffic within the network.
It provides defense with mutual TLS (mTLS) encryption of the traffic between your services, and the mesh can automatically encrypt and decrypt requests and responses, which removes that burden from application developers. The mesh can also improve performance by prioritizing the reuse of existing, persistent connections, which reduces the need for the computationally expensive creation of new ones. With service mesh, you can secure traffic over the wire and also make strong identity-based authentication and authorizations for each microservice.
We see that a service mesh has a lot of value of enterprise companies, because a mesh allows you to see whether mTLS is enabled and working between each of your services. Also, you can get immediate alerts if the security status changes.
- Ingress & egress control
It allows you to monitor and address compromising traffic as it passes through the mesh. For example, if Istio integrates with Kubernetes as an ingress controller, it can take care of load balancing for ingress. This allows defenders to add a level of security at the perimeter with ingress rules, while egress control allows you to see and manage external services and control how your services interact with traffic.
- Operational Control
It can help security and platform teams set the right macro controls to enforce access controls, while allowing developers to make customizations they need to move quickly within these guardrails.
- Ability to manage RBAC
A service mesh can help defenders implement a strong Role Based Access Control (RBAC) system, which is arguably one of the most critical requirements in large engineering organizations. Even a secure system can be easily circumvented by over-privileged users or employees, and an RBAC system can:
- Restrict privileged users to least privileges necessary to perform job responsibilities
- Ensure that access to systems are set to “deny all” by default
- Help developers make sure that proper documentation detailing roles and responsibilities are in place, which is one of the most critical security concerns in the enterprise.
Disadvantages of the security mesh
Though a service mesh has many advantages, they also bring in a unique set of challenges and a few of them are listed below:
- Adds A New Layer of Complexity
When proxies, sidecars and other components are introduced an already sophisticated environment, it dramatically increases the complexity of development and operations.
- Additional Expertise Is Required
If a mesh like Istio is added on top of an orchestrator such as Kubernetes, operators need to become experts in both technologies.
- Infrastructure Can Be Slowed
Because a service mesh is an invasive and intricate technology, it can significantly slow down an architecture.
- Requires Adoption of Yet Another Platform
Since service meshes are invasive, they force developers and operators to adapt to a highly opinionated platform and conform to its rules.
Implementing centralized policy management
There are numerous projects which are able to provide centralized policy management for a Kubernetes cluster, including the Open Policy Agent (OPA) project, Kyverno, or the Validating Admission Policy (a built-in feature released to general availability in 1.30). In order to provide an example with some depth, we will focus on OPA in this cheat sheet.
OPA was started in 2016 to unify policy enforcement across different technologies and systems, and it can be used to enforce policies on a platform like Kubernetes. Currently, OPA is part of CNCF as an incubating project. It can create a unified method of enforcing security policy in the stack. While developers can impose fine-grained control over the cluster with RBAC and Pod security policies, these technologies only apply to the cluster but not outside the cluster.
Since OPA is a general-purpose, domain-agnostic policy enforcement tool that is not based on any other project, the policy queries and decisions do not follow a specific format. Thus it can be integrated with APIs, the Linux SSH daemon, an object store like Ceph, and you can use any valid JSON data as request attributes as long as it provides the required data. OPA allows you to choose what is input and what is output--for example, you can opt to have OPA return a True or False JSON object, a number, a string, or even a complex data object.
Most common use cases of OPA
OPA for application authorization
OPA can provide developers with an already-developed authorization technology so the team doesn’t have to develop one from scratch. It uses a declarative policy language purpose built for writing and enforcing rules such as, “Alice can write to this repository,” or “Bob can update this account.” This technology provides a rich suite of tools that can allow developers to integrate policies into their applications and allow end users to also create policy for their tenants.
If you already have a homegrown application authorization solution, you may not want to swap in OPA. But if you want to improve developer efficiency by moving to a solution that scales with microservices and allows you to decompose monolithic apps, you’re going to need a distributed authorization system and OPA (or one of the related competitors) could be the answer.
OPA for Kubernetes admission control
Since Kubernetes gives developers tremendous control over the traditional silos of "compute, networking and storage," they can use it to set up their network exactly the way they want and set up storage exactly the way they want. But this means that administrators and security teams must make sure that developers don’t shoot themselves (or their neighbors) in the foot.
OPA can address these security concerns by allowing security to build policies that require all container images to be from trusted sources, prevent developers from running software as root, make sure storage is always marked with the encrypt bit and storage does not get deleted just because a pod gets restarted, that limits internet access, etc.
It can also allow administrators to make sure that policy changes don’t inadvertently do more damage than good. OPA integrates directly into the Kubernetes API server and it has complete authority to reject any resource that the admission policy says does not belong in a cluster—-whether it is compute-related, network-related, storage-related, etc. Moreover, policy can be run out-of-band to monitor results and OPA's policies can be exposed early in the development lifecycle (e.g. the CICD pipeline or even on developer laptops) if developers need feedback early.
OPA for service mesh authorization
And finally, OPA can regulate use of service mesh architectures. Often, administrators ensure that compliance regulations are satisfied by building policies into the service mesh even when modification to source code is involved. Even if you’re not embedding OPA to implement application authorization logic (the top use case discussed above), you can control the APIs microservices by putting authorization policies into the service mesh. But if you are motivated by security, you can implement policies in the service mesh to limit lateral movement within a microservice architecture.
Limiting resource usage on a cluster
It is important to define resource quotas for containers in Kubernetes, since all resources in a Kubernetes cluster are created with unbounded CPU limits and memory requests/limits by default. If you run resource-unbound containers, your system will be in risk of Denial of Service (DoS) or “noisy neighbor” scenarios. Fortunately, OPA can use resource quotas on a namespace, which will limit the number or capacity of resources granted to that namespace and restrict that namespace by defining its CPU capacity, memory, or persistent disk space.
Additionally, the OPA can limit how many pods, services, or volumes exist in each namespace, and it can restrict the maximum or minimum size of some of the resources above. The resource quotas provide default limits when none are specified and prevent users from requesting unreasonably high or low values for commonly reserved resources like memory.
Below is an example of defining namespace resource quota in the appropriate yaml. It limits the number of pods in the namespace to 4, limits their CPU requests between 1 and 2 and memory requests between 1GB to 2GB.
compute-resources.yaml:
apiVersion: v1
kind: ResourceQuota
metadata:
  name: compute-resources
spec:
  hard:
    pods: "4"
    requests.cpu: "1"
    requests.memory: 1Gi
    limits.cpu: "2"
    limits.memory: 2Gi
Assign a resource quota to namespace:
kubectl create -f ./compute-resources.yaml --namespace=myspace
For more information on configuring resource quotas, refer to the Kubernetes documentation at https://kubernetes.io/docs/concepts/policy/resource-quotas/.
Use Kubernetes network policies to control traffic between pods and clusters
If your cluster runs different applications, a compromised application could attack other neighboring applications. This scenario might happen because Kubernetes allows every pod to contact every other pod by default. If ingress from an external network endpoint is allowed, the pod will be able to send its traffic to an endpoint outside the cluster.
It is strongly recommended that developers implement network segmentation, because it is a key security control that ensures that containers can only communicate with other approved containers and prevents attackers from pursuing lateral movement across containers. However, applying network segmentation in the cloud is challenging because of the “dynamic” nature of container network identities (IPs).
While users of Google Cloud Platform can benefit from automatic firewall rules, which prevent cross-cluster communication, other users can apply similar implementations by deploying on-premises using network firewalls or SDN solutions. Also, the Kubernetes Network SIG is working on methods that will greatly improve the pod-to-pod communication policies. A new network policy API should address the need to create firewall rules around pods, limiting the network access that a containerized can have.
The following is an example of a network policy that controls the network for “backend” pods, which only allows inbound network access from “frontend” pods:
POST /apis/net.alpha.kubernetes.io/v1alpha1/namespaces/tenant-a/networkpolicys
{
  "kind": "NetworkPolicy",
  "metadata": {
    "name": "pol1"
  },
  "spec": {
    "allowIncoming": {
      "from": [{
        "pods": { "segment": "frontend" }
      }],
      "toPorts": [{
        "port": 80,
        "protocol": "TCP"
      }]
    },
    "podSelector": {
      "segment": "backend"
    }
  }
}
For more information on configuring network policies, refer to the Kubernetes documentation at https://kubernetes.io/docs/concepts/services-networking/network-policies.
Securing data
Keep secrets as secrets
It is important to learn how sensitive data such as credentials and keys are stored and accessed in your infrastructure. Kubernetes keeps them in a "secret," which is a small object that contains sensitive data, like a password or token.
It is best for secrets to be mounted into read-only volumes in your containers, rather than exposing them as environment variables. Also, secrets must be kept separate from an image or pod or anyone with access to the image would have access to the secret as well, even though a pod is not able to access the secrets of another pod. Complex applications that handle multiple processes and have public access are especially vulnerable in this regard.
Encrypt secrets at rest
Always encrypt your backups using a well reviewed backup and encryption solution and consider using full disk encryption where possible, because the etcd database contains any information accessible via the Kubernetes API. Access to this database could provide an attacker with significant visibility into the state of your cluster.
Kubernetes supports encryption at rest, a feature introduced in 1.7, and v1 beta since 1.13, which will encrypt Secret resources in etcd and prevent parties with access to your etcd backups from viewing the content of those secrets. While this feature is currently beta, it offers an additional level of defense when backups are not encrypted or an attacker gains read access to etcd.
Alternatives to Kubernetes Secret resources
Since an external secrets manager can store and manage your secrets rather than storing them in Kubernetes Secrets, you may want to consider this security alternative. A manager provides a number of benefits over using Kubernetes Secrets, including the ability to handle secrets across multiple clusters (or clouds), and the ability to control and rotate secrets centrally.
For more information on Secrets and their alternatives, refer to the documentation at https://kubernetes.io/docs/concepts/configuration/secret/.
Also see the Secrets Management cheat sheet for more details and best practices on managing secrets.
Finding exposed secrets
We strongly recommend that you review the secret material present on the container against the principle of 'least privilege' and assess the risk posed by a compromise.
Remember that open-source tools such as Trivy and Gitleaks can scan container filesystems for sensitive resources, such as API tokens, passwords, and keys. Such resources would be accessible to any user who had access to the unencrypted container filesystem, whether during build, at rest in a registry or backup, or running.
SECTION 5: Kubernetes Security Best Practices: Runtime Phase
When the Kubernetes infrastructure enters the runtime phase, containerized applications are exposed to a slew of new security challenges. You must gain visibility into your running environment so you can detect and respond to threats as they arise.
If you proactively secure your containers and Kubernetes deployments at the build and deploy phases, you can greatly reduce the likelihood of security incidents at runtime and the subsequent effort needed to respond to them.
First, monitor the most security-relevant container activities, including:
- Process activity
- Network communications among containerized services
- Network communications between containerized services and external clients and servers
Detecting anomalies by observing container behavior is generally easier in containers than in virtual machines because of the declarative nature of containers and Kubernetes. These attributes allow easier introspection into what you have deployed and its expected activity.
Use Pod Security Admission to prevent risky containers/Pods from being deployed
The previously recommended Pod Security Policy is deprecated and replaced by Pod Security Admission, a new feature that allows you to enforce security policies on pods in a Kubernetes cluster.
It is recommended to use the baseline level as a minimum security requirement for all pods to ensure a standard level of security across the cluster. However, clusters should strive to apply the restricted level which follows pod hardening best practices.
For more information on configuring Pod Security Admission, refer to the documentation at https://kubernetes.io/docs/tasks/configure-pod-container/enforce-standards-admission-controller/.
Container Runtime Security
If containers are hardened containers at runtime, security teams have the ability to detect and respond to threats and anomalies while the containers or workloads are in a running state. Typically, this is carried out by intercepting the low-level system calls and looking for events that may indicate compromise. Some examples of events that should trigger an alert would include:
- A shell is run inside a container
- A container mounts a sensitive path from the host such as /proc
- A sensitive file is unexpectedly read in a running container such as /etc/shadow
- An outbound network connection is established
Open source tools such as Falco from Sysdig can help operators get up and running with container runtime security by providing defenders with a large number of out-of-the-box detections as well as the ability to create custom rules.
Container Sandboxing
When container runtimes are permitted to make direct calls to the host kernel, the kernel often interacts with hardware and devices to respond to the request. Though Cgroups and namespaces give containers a certain amount of isolation, the kernel still presents a large attack surface. When defenders have to deal with multi-tenant and highly untrusted clusters, they often add additional layer of sandboxing to ensure that container breakout and kernel exploits are not present. Below, we will explore a few OSS technologies that help further isolate running containers from the host kernel:
- Kata Containers: Kata Containers is an OSS project that uses stripped-down VMs to keep the resource footprint minimal and maximize performance to ultimately isolate containers further.
- gVisor : gVisor is a more lightweight kernel than a VM (even stripped down). It is its own independent kernel written in Go and sits in the middle of a container and the host kernel. It is a strong sandbox--gVisor supports ~70% of the linux system calls from the container but ONLY uses about 20 system calls to the host kernel.
- Firecracker: It is a super lightweight VM that runs in user space. Since it is locked down by seccomp, cgroup, and namespace policies, the system calls are very limited. Firecracker is built with security in mind, however it may not support all Kubernetes or container runtime deployments.
Preventing containers from loading unwanted kernel modules
Because Linux kernel automatically loads kernel modules from disk if needed in certain circumstances, such as when a piece of hardware is attached or a filesystem is mounted, this can be a significant attack surface. Of particular relevance to Kubernetes, even unprivileged processes can cause certain network-protocol-related kernel modules to be loaded, just by creating a socket of the appropriate type. This situation may allow attackers to exploit a security hole in kernel modules that the administrator assumed was not in use.
To prevent specific modules from being automatically loaded, you can uninstall them from the node, or add rules to block them. On most Linux distributions, you can do that by creating a file such as /etc/modprobe.d/kubernetes-blacklist.conf with contents like:
# DCCP is unlikely to be needed, has had multiple serious
# vulnerabilities, and is not well-maintained.
blacklist dccp

# SCTP is not used in most Kubernetes clusters, and has also had
# vulnerabilities in the past.
blacklist sctp
To block module loading more generically, you can use a Linux Security Module (such as SELinux) to completely deny the module_request permission to containers, preventing the kernel from loading modules for containers under any circumstances. (Pods would still be able to use modules that had been loaded manually, or modules that were loaded by the kernel on behalf of some more-privileged process).
Compare and analyze different runtime activity in pods of the same deployments
When containerized applications are replicated for high availability, fault tolerance, or scale reasons, these replicas should behave nearly identically. If a replica has significant deviations from the others, defenders would want further investigation. Your Kubernetes security tool should be integrated with other external systems (email, PagerDuty, Slack, Google Cloud Security Command Center, SIEMs [security information and event management], etc.) and leverage deployment labels or annotations to alert the team responsible for a given application when a potential threat is detected. If you chose to use a commercial Kubernetes security vendor, they should support a wide array of integrations with external tools.
Monitor network traffic to limit unnecessary or insecure communication
Containerized applications typically make extensive use of cluster networking, so observing active networking traffic is a good way to understand how applications interact with each other and identify unexpected communication. You should observe your active network traffic and compare that traffic to what is allowed based on your Kubernetes network policies.
At the same time, comparing the active traffic with what’s allowed gives you valuable information about what isn’t happening but is allowed. With that information, you can further tighten your allowed network policies so that it removes superfluous connections and decreases your overall attack surface.
Open source projects like https://github.com/kinvolk/inspektor-gadget or https://github.com/deepfence/PacketStreamer may help with this, and commercial security solutions provide varying degrees of container network traffic analysis.
If breached, scale suspicious pods to zero
Contain a successful breach by using Kubernetes native controls to scale suspicious pods to zero or kill then restart instances of breached applications.
Rotate infrastructure credentials frequently
The shorter the lifetime of a secret or credential, the harder it is for an attacker to make use of that credential. Set short lifetimes on certificates and automate their rotation. Use an authentication provider that can control how long issued tokens are available and use short lifetimes where possible. If you use service account tokens in external integrations, plan to rotate those tokens frequently. For example, once the bootstrap phase is complete, a bootstrap token used for setting up nodes should be revoked or its authorization removed.
Logging
Kubernetes supplies cluster-based logging, which allows you to log container activity into a central log hub. When a cluster is created, the standard output and standard error output of each container can be ingested using a Fluentd agent running on each node (into either Google Stackdriver Logging or into Elasticsearch) and viewed with Kibana.
Enable audit logging
The audit logger is a beta feature that records actions taken by the API for later analysis in the event of a compromise. It is recommended to enable audit logging and archive the audit file on a secure server
Ensure logs that are monitoring for anomalous or unwanted API calls, especially any authorization failures (these log entries will have a status message “Forbidden”). Authorization failures could mean that an attacker is trying to abuse stolen credentials.
Managed Kubernetes providers, including GKE, provide access to this data in their cloud console and may allow you to set up alerts on authorization failures.
Audit logs
Audit logs can be useful for compliance as they should help you answer the questions of what happened, who did what and when. Kubernetes provides flexible auditing of kube-apiserver requests based on policies. These help you track all activities in chronological order.
Here is an example of an audit log:
{
  "kind":"Event",
  "apiVersion":"audit.k8s.io/v1beta1",
  "metadata":{ "creationTimestamp":"2019-08-22T12:00:00Z" },
  "level":"Metadata",
  "timestamp":"2019-08-22T12:00:00Z",
  "auditID":"23bc44ds-2452-242g-fsf2-4242fe3ggfes",
  "stage":"RequestReceived",
  "requestURI":"/api/v1/namespaces/default/persistentvolumeclaims",
  "verb":"list",
  "user": {
    "username":"[email protected]",
    "groups":[ "system:authenticated" ]
  },
  "sourceIPs":[ "172.12.56.1" ],
  "objectRef": {
    "resource":"persistentvolumeclaims",
    "namespace":"default",
    "apiVersion":"v1"
  },
  "requestReceivedTimestamp":"2019-08-22T12:00:00Z",
  "stageTimestamp":"2019-08-22T12:00:00Z"
}
Define Audit Policies
Audit policy sets rules which define what events should be recorded and what data is stored when an event includes. The audit policy object structure is defined in the audit.k8s.io API group. When an event is processed, it is compared against the list of rules in order. The first matching rule sets the "audit level" of the event.
The known audit levels are:
- None - don't log events that match this rule
- Metadata - log request metadata (requesting user, timestamp, resource, verb, etc.) but not request or response body
- Request - log event metadata and request body but not response body. This does not apply for non-resource requests
- RequestResponse - log event metadata, request and response bodies. This does not apply for non-resource requests
You can pass a file with the policy to kube-apiserver using the --audit-policy-file flag. If the flag is omitted, no events are logged. Note that the rules field must be provided in the audit policy file. A policy with no (0) rules is treated as illegal.
Understanding Logging
One main challenge with logging Kubernetes is understanding what logs are generated and how to use them. Let’s start by examining the overall picture of Kubernetes' logging architecture.
Container logging
The first layer of logs that can be collected from a Kubernetes cluster are those being generated by your containerized applications. The easiest method for logging containers is to write to the standard output (stdout) and standard error (stderr) streams.
Manifest is as follows.
apiVersion: v1
kind: Pod
metadata:
  name: example
spec:
  containers:
    - name: example
      image: busybox
      args: [/bin/sh, -c, 'while true; do echo $(date); sleep 1; done']
To apply the manifest, run:
kubectl apply -f example.yaml
To take a look the logs for this container, run:
kubectl log <container-name> command.
For persisting container logs, the common approach is to write logs to a log file and then use a sidecar container. As shown below in the pod configuration above, a sidecar container will run in the same pod along with the application container, mounting the same volume and processing the logs separately.
An example of a Pod Manifest is seen below:
apiVersion: v1
kind: Pod
metadata:
  name: example
spec:
  containers:
  - name: example
    image: busybox
    args:
    - /bin/sh
    - -c
    - >
      while true;
      do
        echo "$(date)\n" >> /var/log/example.log;
        sleep 1;
      done
    volumeMounts:
    - name: varlog
      mountPath: /var/log
  - name: sidecar
    image: busybox
    args: [/bin/sh, -c, 'tail -f /var/log/example.log']
    volumeMounts:
    - name: varlog
      mountPath: /var/log
  volumes:
  - name: varlog
    emptyDir: {}
Node logging
When a container running on Kubernetes writes its logs to stdout or stderr streams, the container engine streams them to the logging driver set by the Kubernetes configuration.
In most cases, these logs will end up in the /var/log/containers directory on your host. Docker supports multiple logging drivers but unfortunately, driver configuration is not supported via the Kubernetes API.
Once a container is terminated or restarted, kubelet stores logs on the node. To prevent these files from consuming all of the host’s storage, the Kubernetes node implements a log rotation mechanism. When a container is evicted from the node, all containers with corresponding log files are evicted.
Depending on what operating system and additional services you’re running on your host machine, you might need to take a look at additional logs.
For example, systemd logs can be retrieved using the following command:
journalctl -u
Cluster logging
In the Kubernetes cluster itself, there is a long list of cluster components that can be logged as well as additional data types that can be used (events, audit logs). Together, these different types of data can give you visibility into how Kubernetes is performing as a system.
Some of these components run in a container, and some of them run on the operating system level (in most cases, a systemd service). The systemd services write to journald, and components running in containers write logs to the /var/log directory, unless the container engine has been configured to stream logs differently.
Events
Kubernetes events can indicate any Kubernetes resource state changes and errors, such as exceeded resource quota or pending pods, as well as any informational messages.
The following command returns all events within a specific namespace:
kubectl get events -n <namespace>

NAMESPACE LAST SEEN TYPE   REASON OBJECT MESSAGE
kube-system  8m22s  Normal   Scheduled            pod/metrics-server-66dbbb67db-lh865                                       Successfully assigned kube-system/metrics-server-66dbbb67db-lh865 to aks-agentpool-42213468-1
kube-system     8m14s               Normal    Pulling                   pod/metrics-server-66dbbb67db-lh865                                       Pulling image "aksrepos.azurecr.io/mirror/metrics-server-amd64:v0.2.1"
kube-system     7m58s               Normal    Pulled                    pod/metrics-server-66dbbb67db-lh865                                       Successfully pulled image "aksrepos.azurecr.io/mirror/metrics-server-amd64:v0.2.1"
kube-system     7m57s               Normal     Created                   pod/metrics-server-66dbbb67db-lh865                                       Created container metrics-server
kube-system     7m57s               Normal    Started                   pod/metrics-server-66dbbb67db-lh865                                       Started container metrics-server
kube-system     8m23s               Normal    SuccessfulCreate          replicaset/metrics-server-66dbbb67db             Created pod: metrics-server-66dbbb67db-lh865
The following command will show the latest events for this specific Kubernetes resource:
kubectl describe pod <pod-name>

Events:
  Type    Reason     Age   From                               Message
  ----    ------     ----  ----                               -------
  Normal  Scheduled  14m   default-scheduler                  Successfully assigned kube-system/coredns-7b54b5b97c-dpll7 to aks-agentpool-42213468-1
  Normal  Pulled     13m   kubelet, aks-agentpool-42213468-1  Container image "aksrepos.azurecr.io/mirror/coredns:1.3.1" already present on machine
  Normal  Created    13m   kubelet, aks-agentpool-42213468-1  Created container coredns
  Normal  Started    13m   kubelet, aks-agentpool-42213468-1  Started container coredns
SECTION 5: Securing a managed-service Kubernetes on Cloud Service Provider
AWS
There are few open source tools that can help you on securing your managed-service Kubernetes on AWS (EKS)
SECTION 6: Supply Chain Security
Container supply chain security is critical for preventing attacks that exploit vulnerabilities in the software delivery process. A compromised supply chain can lead to malicious code being deployed into production environments, potentially affecting thousands of containers and applications.
Supply chain attacks in Kubernetes environments typically target:
- Base images and dependencies
- Build processes and CI/CD pipelines
- Container registries
- Deployment manifests and Helm charts
- Third-party libraries and packages
Recent high-profile attacks (SolarWinds, Codecov, ua-parser-js) demonstrate the severe impact of supply chain compromises.
Best practices for securing the container supply chain
- Use trusted base images: Start with minimal, verified base images from reputable sources to reduce vulnerabilities.
- Implement image scanning: Regularly scan container images for vulnerabilities using tools like Clair, Trivy, or Aqua Security.
- Secure CI/CD pipelines: Ensure that build processes are secure, with proper access controls and monitoring.
- Sign and verify images: Use image signing tools like Notary or Cosign to ensure the integrity of container images.
- Use private registries: Store container images in private registries with access controls to prevent unauthorized access.
- Monitor for vulnerabilities: Continuously monitor for new vulnerabilities in dependencies and base images.
- Implement runtime security: Use tools to monitor container behavior at runtime and detect anomalies.
SECTION 7: Final Thoughts
Embed security into the container lifecycle as early as possible
You must integrate security earlier into the container lifecycle and ensure alignment and shared goals between security and DevOps teams. Security can (and should) be an enabler that allows your developers and DevOps teams to confidently build and deploy applications that are production-ready for scale, stability and security.
Use Kubernetes-native security controls to reduce operational risk
Leverage the native controls built into Kubernetes whenever available in order to enforce security policies so that your security controls don’t collide with the orchestrator. Instead of using a third-party proxy or shim to enforce network segmentation, you could use Kubernetes network policies to ensure secure network communication.
Leverage the context that Kubernetes provides to prioritize remediation efforts
Note that manually triaging security incidents and policy violations is time consuming in sprawling Kubernetes environments.
For example, a deployment containing a vulnerability with severity score of 7 or greater should be moved up in remediation priority if that deployment contains privileged containers and is open to the Internet but moved down if it’s in a test environment and supporting a non-critical app.
References
Control plane documentation - https://kubernetes.io
- Kubernetes Security Best Practices everyone must follow - https://www.cncf.io/blog/2019/01/14/9-kubernetes-security-best-practices-everyone-must-follow
- Securing a Cluster - https://kubernetes.io/docs/tasks/administer-cluster/securing-a-cluster
- Security Best Practices for Kubernetes Deployment - https://kubernetes.io/blog/2016/08/security-best-practices-kubernetes-deployment
- Kubernetes Security Best Practices - https://phoenixnap.com/kb/kubernetes-security-best-practices
- Kubernetes Security 101: Risks and 29 Best Practices - https://www.stackrox.com/post/2020/05/kubernetes-security-101
- 15 Kubernetes security best practice to secure your cluster - https://www.mobilise.cloud/15-kubernetes-security-best-practice-to-secure-your-cluster
- The Ultimate Guide to Kubernetes Security - https://neuvector.com/container-security/kubernetes-security-guide
- A hacker's guide to Kubernetes security - https://techbeacon.com/enterprise-it/hackers-guide-kubernetes-security
- 11 Ways (Not) to Get Hacked - https://kubernetes.io/blog/2018/07/18/11-ways-not-to-get-hacked
- 12 Kubernetes configuration best practices - https://www.stackrox.com/post/2019/09/12-kubernetes-configuration-best-practices/#6-securely-configure-the-kubernetes-api-server
- A Practical Guide to Kubernetes Logging - https://logz.io/blog/a-practical-guide-to-kubernetes-logging
- Kubernetes Web UI (Dashboard) - https://kubernetes.io/docs/tasks/access-application-cluster/web-ui-dashboard
- Tesla cloud resources are hacked to run cryptocurrency-mining malware - https://arstechnica.com/information-technology/2018/02/tesla-cloud-resources-are-hacked-to-run-cryptocurrency-mining-malware
- OPEN POLICY AGENT: CLOUD-NATIVE AUTHORIZATION - https://blog.styra.com/blog/open-policy-agent-authorization-for-the-cloud
- Introducing Policy As Code: The Open Policy Agent (OPA) - https://www.magalix.com/blog/introducing-policy-as-code-the-open-policy-agent-opa
- What service mesh provides - https://aspenmesh.io/wp-content/uploads/2019/10/AspenMesh_CompleteGuide.pdf
- Three Technical Benefits of Service Meshes and their Operational Limitations, Part 1 - https://glasnostic.com/blog/service-mesh-istio-limits-and-benefits-part-1
- Open Policy Agent: What Is OPA and How It Works (Examples) - https://spacelift.io/blog/what-is-open-policy-agent-and-how-it-works
- Send Kubernetes Metrics To Kibana and Elasticsearch - https://logit.io/sources/configure/kubernetes/
- Kubernetes Security Checklist - https://kubernetes.io/docs/concepts/security/security-checklist/